> For the complete documentation index, see [llms.txt](https://help.lob.com/llms.txt). Markdown versions of documentation pages are available by appending `.md` to page URLs; this page is available as [Markdown](https://help.lob.com/print-and-mail/reaching-your-audience/campaign-audience-guide.md).
# Campaign audience guide
## Overview
The foundation of any effective marketing campaign strategy is to have a specific and defined audience of contacts. Creating a targeted audience list by utilizing important customer data, such as past purchase history, product engagement or site interaction, or loyalty or subscription data, can be an effective way to test your marketing performance.
As you export your campaign audience list to bring it into Lob, keep the following guidelines in mind when using the [Campaigns](/print-and-mail/send-mail/launch-your-first-campaign.md) feature, either in the [Dashboard](https://dashboard.lob.com/campaigns) or the [API](https://docs.lob.com/#tag/Campaigns).
## Step 1: Build your audience file
### File formatting
All CSVs, or comma-separated values, are required to contain recipient address data. If you are using HTML templates with merge variables for your creative, your CSV must also include merge variable data.
Files must have a **.csv** filename extension and **must not exceed 500MB**. Also note, though this is typically already the default, **UTF-8 encoding is required** for CSV files.
### Formatting field & record values
CSV output will always start with the first row returning the column field names. Then the data itself will follow as CSV records.
Whitespace characters (spaces, pilcrows, and carriage returns) will be trimmed at the start and end of each value to ensure we can process the CSV. For example, " John Doe " will be trimmed to "John Doe". Any whitespace characters inside the value will *not* be trimmed.
You are not required to name your columns to Lob's naming convention, as you can easily map them in the Dashboard. However, any fields that use Lob's naming convention will be automatically mapped. The Lob naming convention for CSV column headers are indicated below in **bold**.
### Required columns
* **`name`**: Recipient name must be 40 characters or less
* Note the name as it appears in this column will appear in the "To" field in the address block on your mail piece
* If more than 40 characters are needed, you can also utilize the (optional) **`company`**field; when both are provided, they will be printed on two separate lines above the rest of the address.
* **`address_line1`**: Must be 64 characters or less
* **`address_city`**: Must be 200 characters or less
* **`address_state`**: [2-letter US state short-name code](https://pe.usps.com/text/pub28/28apb.htm) (e.g. CA for California)
* **`address_zip`**: Must follow the ZIP format of 12345 or ZIP+4 format of 12345-1234
* Lookout! MS Excel and Google Sheets may attempt to drop leading zero.
* Any merge variable data
* When using merge variables that point to a URL, like images or custom fonts, ensure the link is public and can be accessed by Lob
### Optional columns
* **`address_line2`**: Must be 64 characters or less
* **`company`**: Must be 40 characters or less
* **`address_country`**: Must be in [ISO 3166-1 alpha-2](https://en.wikipedia.org/wiki/List_of_ISO_3166_country_codes) convention (e.g. US for the United States of America)
### Metadata columns
Tagging your mailpieces with [metadata](/print-and-mail/building-a-mail-strategy/managing-mail-settings/using-metadata.md) can help identify and group your mail sent in any given campaign for easier reporting and attribution. While optional, if you choose to add metadata tags, you cannot add more than 20 Key-Value pairs. **Keys** can be at most 40 characters and **values** must be at most 500 characters.
* **Recipient metadata**: is passed in the CSV and applies to each individual ***row***, or recipient. Recipient metadata is great for tags that are specific to each recipient of mail, like `state:NC` or `first_name:John`.
Recipient metadata can be passed in the CSV one of two ways:
1. **As regular column data**: You can use any number of the CSV columns as metadata for your mailpieces such as “name”, “address\_line1”, etc. The values for this column for each row should be regular text and **not** JSON formatted. See our [API documentation](https://docs.lob.com/#tag/Uploads/operation/upload_create) on how to use more than one column from your CSV file as metadata.\
\
Example: If you have a column header in your CSV file called “`recipient`” and the value of the cell for this column in the first row is “`john_smith`”, then the metadata that gets attached to your mailpiece for this row will be “`recipient: john_smith`”
2. **In multiple columns, prefixed with `metadata_`**. For example, your file could have `metadata_key1` and `metadata_key2` columns, and then the values that correspond to each mailpiece in each row.
* This is different than **Campaign Metadata**
* It is configured on the `POST /v1/campaigns` [API call](https://docs.lob.com/#tag/Campaigns) or in the Lob dashboard, on the Campaigns [Configure Settings](https://dashboard.lob.com/campaigns/create/settings) screen in Step 1 at the bottom in the “Add campaign-level metadata tags” section.
* Note: Campaign metadata is **not configurable within your CSV**
* Each individual mailpiece created through the campaign will inherit Campaign metadata. This is ideal for tags you’d like to apply to an entire campaign and can be set in Step 1.
{% hint style="warning" %}
Only 1 of the above methods can be used at once. If you have a column name prefixed with `metadata_` in your CSV file but you’ve also selected a regular column to be used as metadata for your mailpiece, then the the values from the `metadata_` prefixed column will NOT be used. We prioritize the manually selected columns to be attached as metadata.
If you have not manually selected any column from your CSV file to be used as metadata and the CSV file contains a `metadata_` prefixed column, then the data from the `metadata_` prefixed columns will be used as metadata for each mailpiece automatically.
Column names prefixed with `metadata_` DO NOT need to be manually selected as metadata. They are automatically applied. If you would like to manually select this column, then simply remove the `metadata_` prefix from the column name.
{% endhint %}
See [Using Metadata](/print-and-mail/building-a-mail-strategy/managing-mail-settings/using-metadata.md) to learn more about how this powerful feature can help parse your mail.
## Step 2: Map your data to your campaign
{% hint style="warning" %}
If a merge variable has the same "name" as a "key" in the `requiredAddressColumnMapping` or `optionalAddressColumnMapping` objects, then they **CANNOT** have a different value in this object. If a different value is provided, then when the campaign is processing it will get overwritten with the mapped value present in the `requiredAddressColumnMapping` or `optionalAddressColumnMapping` objects. The redirect URLs for QR codes can also be customized using this mapping. If the URL has a variable and the variable mapping existsing here, then data from the respective column in the audience file will be merged into the URL template.
{% endhint %}
### Dashboard
Upload your CSV file in [Campaigns](https://dashboard.lob.com/campaigns) > Step 2: Add Audience.
### Campaigns API
When [sending](/print-and-mail/send-mail/send-campaigns-via-the-campaigns-api.md) the `POST` or `PATCH` request to the `/v1/uploads` endpoint, you will need to pass in an array of key-value pairs in the `requiredAddressColumnMapping` property. The keys will be the Lob-required field names, and the values will be the column headers in your CSV.
For the other properties that you can pass in the payload, refer to our [API documentation](https://docs.lob.com/#tag/Uploads/operation/upload_create).
Example: `POST /v1/uploads`
```
{
"campaignId": "{{campaign_id}}",
"requiredAddressColumnMapping": {
"name": "recipient",
"address_line1": "primary line",
"address_zip": "zip_code",
"address_state": "state",
"address_city": "city"
}
}
```
## Step 3: Add your return address (if applicable)
Within campaigns, you're able to choose if you'd like to have a single return address or a personalized return address for your recipients. A return address is optional depending on the form factor (e.g. Postcards), but required for other form factors (e.g. Letters).
### Single Return Address
A single return address allows you to select a return address that you have created within Lob, to use across all of your recipients in your campaign. In this case, every recipient will have the same return address on their mail piece.
### Personalized Return Address
A personalized return address allows you to have a unique return address for each recipient within a Campaign.
Within the campaign flow, in Step 2: Add Audience, a block will appear to set up your return address after you have added your audience to the campaign. The default option is to use a Single Return Address, or you can select Personalized Return Address.
When you select Personalized Return Address and new mapping fields to map the return address values will appear if you have already uploaded your audience file. Similar to the address mapping for a recipient delivery address, the return address mapping connects to the CSV file uploaded in one-time campaigns and the integration table for automated campaigns.
\
If you have Personalized return address selected, then the fields below will be required in order for you to submit the campaign:
1. Default return address
1. If there is any data field missing in your audience file for a particular recipient, the default return address will be used as a fallback option to still produce a valid return address on your mail piece.
2. Return\_address\_name
1. The name (first/last) for the return address
3. Return\_address\_line1
4. Return\_address\_city
5. Return\_address\_state
6. Return\_address\_zip
Optional return address fields can be added to the return address, but are not required to be filled in to submit the campaign:
1. Return\_address\_line2
2. Return\_address\_company
3. Return\_address\_country
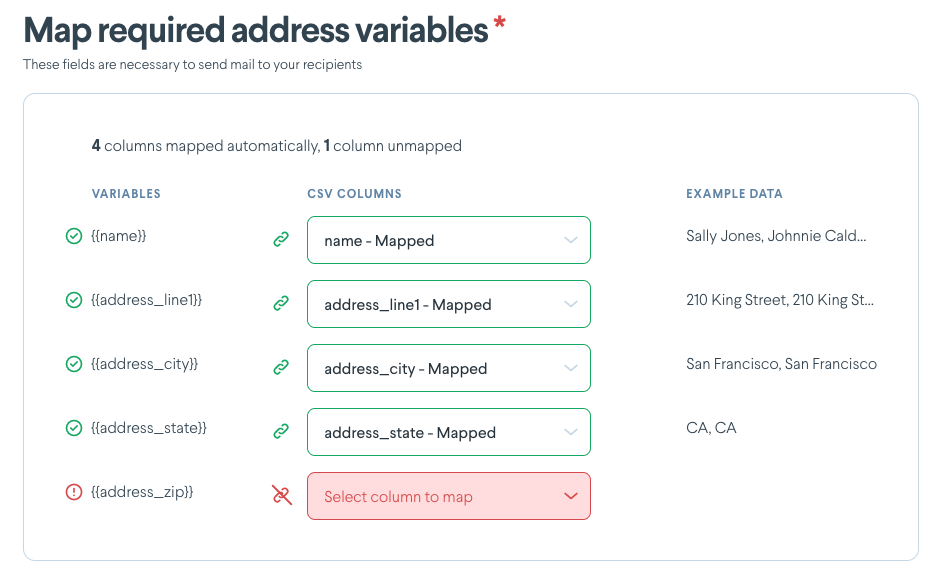
Required fields are denoted in the UI with a red exclamation icon, whereas the optional fields show a gray exclamation icon.
Similar to the recipient delivery address mapping, if your audience file includes the column headings that match the return address variables above, then we will auto-map these variables together. If we can’t detect which column to auto-map to, then you will need to manually map these fields together to properly connect.
\
You cannot use the same return address column data as used in a recipient address delivery field. For example, if you have an “address\_line\_1” column in your audience file and you map that to the recipient address line 1 field, you can’t also use that same address\_line\_1 field for the return address line 1. In this case, if you have already used that field in another mapping, then when you go to select that column in the return address mapping it would say “already mapped”. There's handling in place that prevents a user from mapping the same address to a recipient to the return address so that a customer doesn't go around the return address in a way they aren't supposed to. When you have all of the mapping implemented correctly you should see a green success indicator for each return address field and no more red exclamation icons.
After you have successfully added and mapped your return address fields on step 2 of campaigns, you will see a confirmation of the field mapping on step 4 of campaigns. Verify the information in step 4 for your return address is correct. If you haven’t done so already, we recommend you generate a creative proof to have a full preview with the address data inserted on the address block for the return address.
After you submit the campaign, in the campaign details page, select the details tab to view the return address details that were submitted with the campaign. At this point, each mail piece created from the campaign will be using a return address based on the mapping you had outlined.
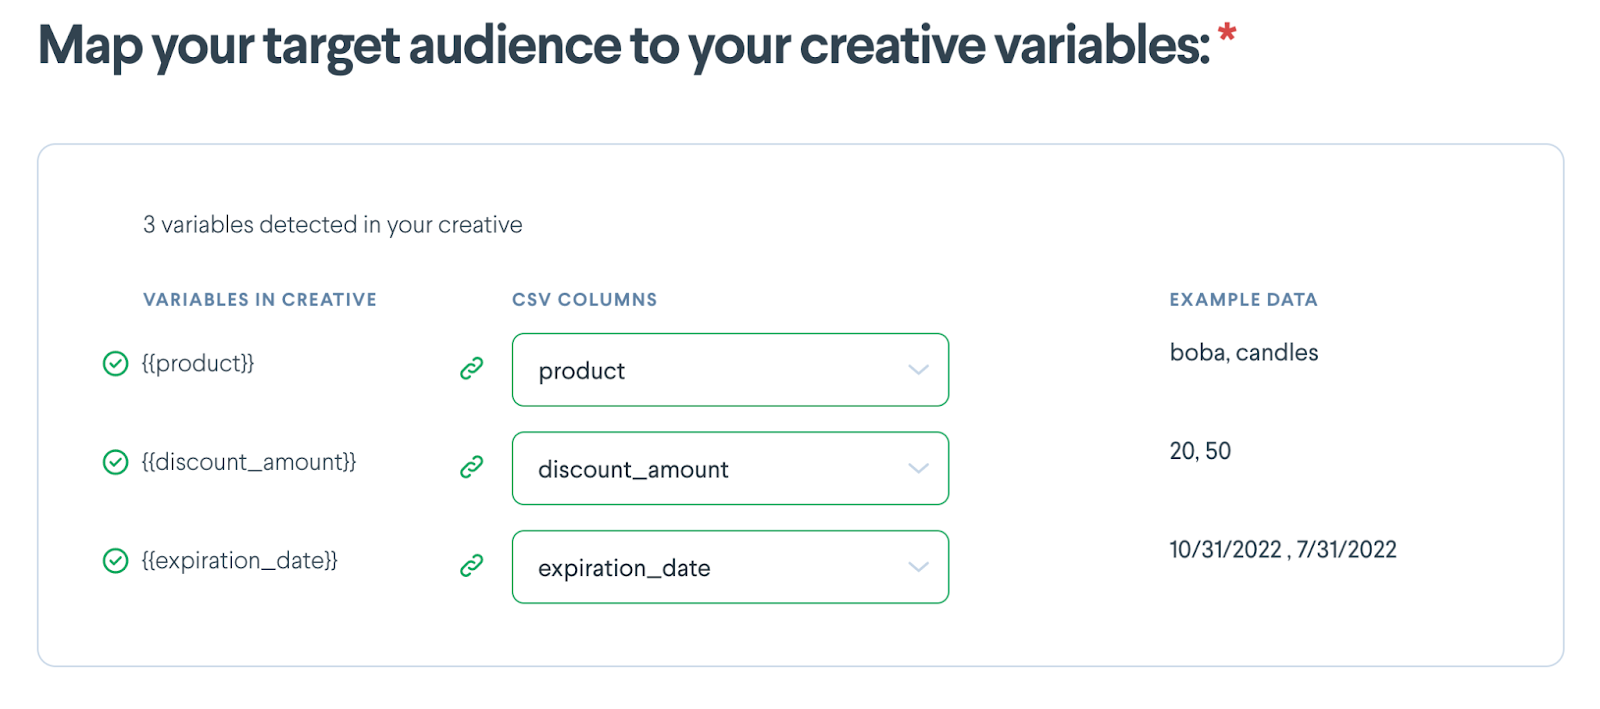
## Step 4: Map merge variable data (if applicable) to your creative
### Dashboard
Merge variable data (if applicable) is mapped in [Campaigns](https://dashboard.lob.com/campaigns) > Step 3: Choose Creative
### Campaigns API
This can either be [configured](/print-and-mail/send-mail/send-campaigns-via-the-campaigns-api.md#step-2-add-creative-8) in Step 2 during the initial `POST` request or updated using a `PATCH`. When sending the request, pass in an array of key-value pairs in the `mergeVariableColumnMapping` property. The keys will be the merge variable names defined in your HTML template and the values will be the column headers in your CSV.
Example: `POST /v1/uploads`
```html
{
"campaignId": "{{campaign_id}}",
"mergeVariableColumnMapping": {
"mergeVariable1": "dog",
"mergeVariable2": "cat",
}
}
```
## Troubleshooting common issues
**When uploading your CSV audience file, ensure the *****filetype***** is correct.**
* To ensure compatibility, ensure your CSV is **UTF-8 encoded (Unicode)**.
* Your file should have an extension that ends in **.csv**.
* In rare cases, your file type might appear to have a .csv extension but actually be saved in a different, unsupported format.
**Avoid opening up your audience CSV in a spreadsheet program like Excel if possible.**
* If you do need to open the file, avoid saving the file or making updates. These programs will automatically make changes to your file when saved, which could potentially cause issues on upload.
* Stripped leading zeros for zip codes are the most common issue. For example, the program turns Zip Code 07751 into 7751. Zip codes that begin with “0” are in the Northeast, specifically CT, MA, ME, VT, NH, NJ, RI.
**Avoid line breaks in your audience file to prevent your CSV from being rejected.**
* If you need line breaks as part of a merge variable, consider using two merge variables at this time.
**Avoid commas in your audience file to prevent your CSV from being rejected.**
* Check if your CSV file has commas that are separating values that belong in unique columns per the specifications above.
**Avoid disallowed characters in the header row.**
* Allowed characters in the headers are: alphanumeric (`a-z`, `A-Z`, `0-9`), underscore (`_`), dash (`-`), parentheses (`()`), space ( ), and period (`.`).